Using the Neuroglancer search/filter tool
There are several ways to select which segments to display in Neuroglancer. One we have already covered in the “Getting Started with Neuroglancer” post is double clicking individual segments to select them. This works well if you already know exactly where the segment is and you only have a few segments. Note: in this post “segments” refers to brain regions, and I will use segments and regions interchangeably.
In cases where you have many regions or you don’t know exactly where a region is by memory, Neuroglancer offers a powerful search feature*. This allows you to filter which brain regions you want to display by pattern matching against the segment name or ID. The search tool can be found in the “Seg.” tab in the control panel on the right hand side of the screen (which can be opened via ctrl+click on the layer name at the top). Note that the tool is only available for segmentation layers (e.g. brain atlases). The following figure shows how to locate the search tool.
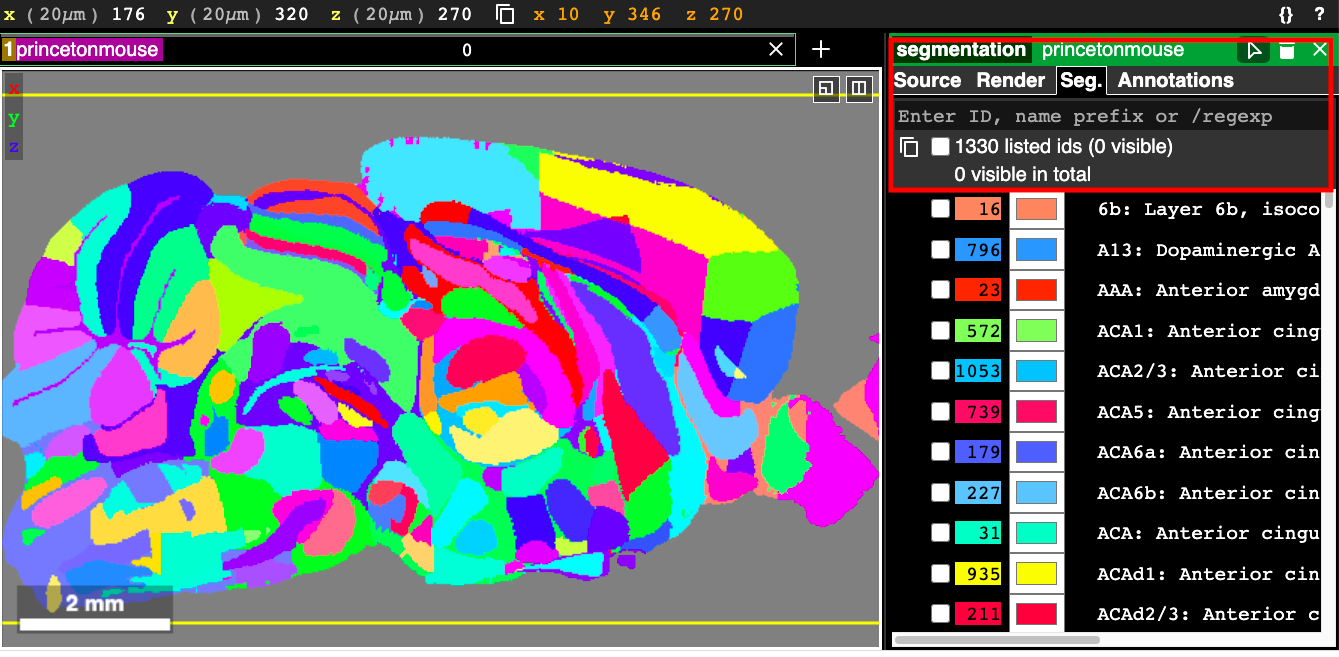
When nothing is entered in the search tool, the text that is displayed gives us some instructions: “Enter ID, name prefix or /regexp”. This explains the three ways you can filter segments. Each segment has an integer ID, shown in the list of segments below the search box in the above figure, and you can simply enter in the ID to select just that region. You can select multiple segments by entering in a comma-separated list of IDs, like in this example:
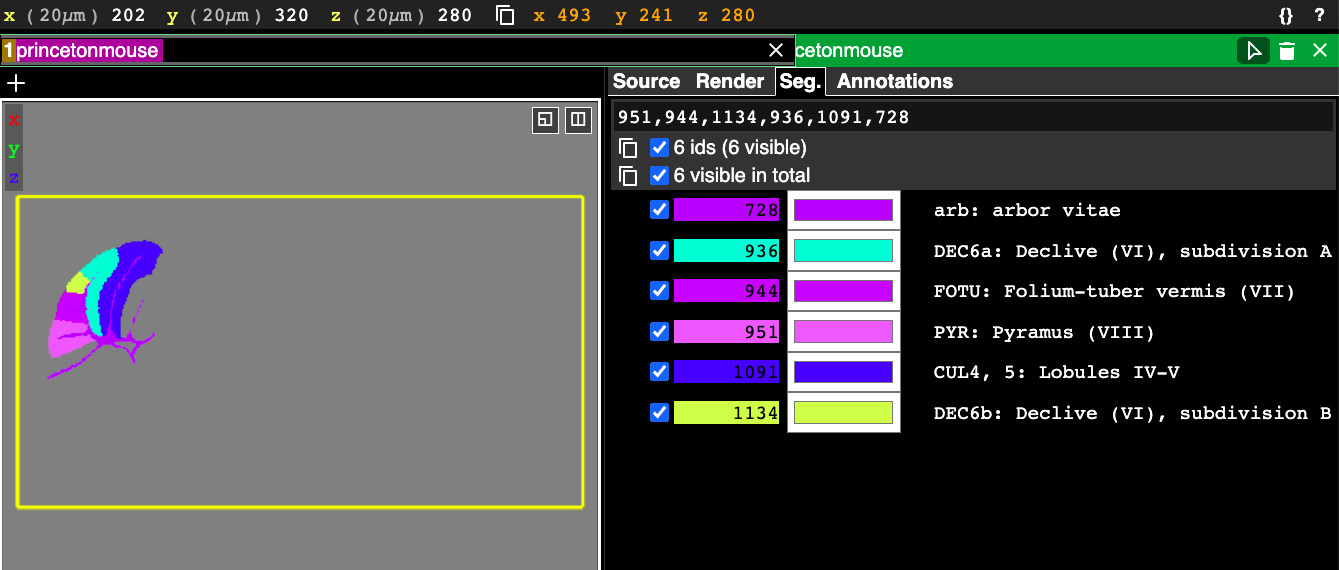
It is often much more convenient to search by region name or acronym than by this somewhat arbitrary integer ID. Notice in the above figure that each selected segment has an entry in the right hand side panel showing the id, color, and the acronym, followed by the full name of the segment. This text here can be used in the search as well.
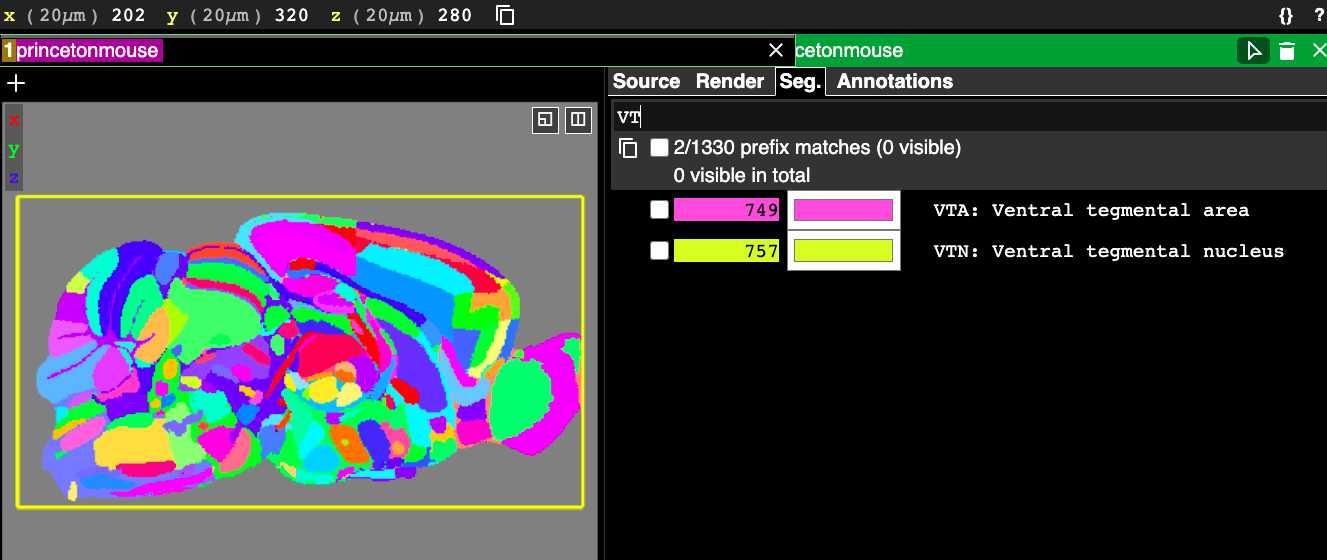
The first way to filter based on text is using the “name prefix”. To do this, you just start typing some text and whichever segments’ text begins with what you’ve typed appears in the segment list below and can be selected. Note that it is case sensitive. In the following example I start typing VT and two matches appear because there are two acronyms in the Princeton Mouse atlas that start with “VT”, which are the VTA and the VTN.
The final way to search is the most powerful and arguably the most useful. This is using the “/regexp” feature, which stands for “regular expressions” (sometimes just called “regex”). Regular expressions are “a sequence of characters that define a search pattern” according to wikipedia: https://en.wikipedia.org/wiki/Regular_expression. Here is a description of some of the special characters that regex uses with interactive examples: https://www.w3schools.com/python/python_regex.asp. It is not necessary to be an expert in regex to use it effectively in Neuroglancer, but knowing a little about some of the special characters it uses can go a long way.
Before diving into regex use cases, it is a good idea to analyze the format of our segment text labels. Understanding the format will help us pattern match using regex much more effectively. Looking at the above figures, note that the segment labels seem to always start with an acronym, following by a “:” then a space, followed by the full region name. The first word after the “:” is usually capitalized, but it is not always as in the example: “arb: arbor vitae”.
Let’s say we want to find a specific brain region, the “mediodorsal nucleus of thalamus” without knowing its acronym or which words if any are capitalized. If we just start typing “mediodorsal” in the search box there are no matches. That is because the search tool by default always tries to match the beginning of the region string, which for this atlas always starts with the acronym. To search for a word within the entire region string but not necessarily at the beginning, we need regex.
To activate the regex, you need to put a “/” before the pattern you are searching for. By typing /mediodorsal this means “search for any instance of the all-lowercase string ‘mediodorsal’ in the entire segment text string”. After typing this in you will see a match, but it’s not the right one. The match is to the region: “IMD: Intermediodorsal nucleus of the thalamus”, where I have bolded the part that gets matched. The regex search is case sensitive. To make the search case insensitive use the regex /[Mm]ediodorsal, where “[Mm]” means match “either M or m”, then match the rest of the word as all lowercase. With this new query you get five matches, including the one we’re after: “MD: Mediodorsal nucleus of thalamus”.
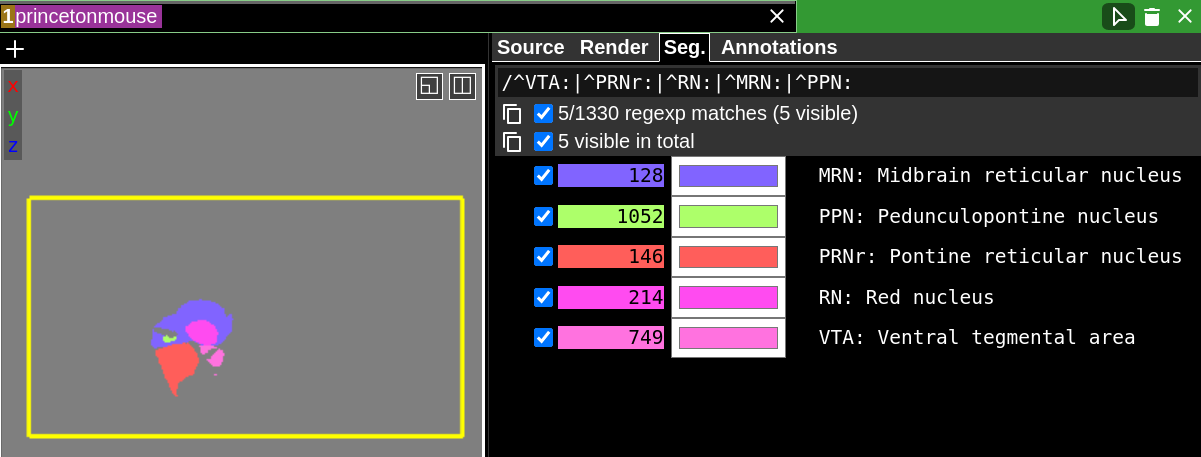
Let’s consider another example where we have a list of five acronyms for regions that we want to show at the same time. We’re not completely sure what the full names of the regions or the IDs they correspond to are. Let’s say these acronyms are: VTA, PRNr, RN, MRN, PPN. We know these will come at the beginning of each match, so we can use the special “^” regex character before our acronym to enable that. We also know that the acronym ends with a literal “:”. This is important to include because if we don’t, searching for RN could match an acronym that starts with RN but has more characters. Finally, we can use the “|” (the regex OR operator) to match multiple acronyms in the same query. The full regex to match all five of these regions using only their acronyms is: /^VTA:|^PRNr:|^RN:|^MRN:|^PPN:. Here it is in action:
Note that not all atlases are guaranteed to have acronyms. We customized the region labels for this atlas to include the acronyms, but other atlases may not even have acronyms. Again, it is a good idea to look at how your segment labels are generally formatted when coming up with the right regex query.
With just a few basic regex operators we are able to achieve a lot of search power. There are many more regex operators (see links above), but we will only discuss one final one, the end of line matching operator, “$”. This is useful if you know the full region name but not the acronym. For example, let’s try to match the region “TH: Thalamus”, but say we don’t remember the acronym. Based on what we have covered so far we might try “/[Tt]halamus”. If we do that, we see 50 matches. No so helpful. If we tack on a “$” at the end of the query: /[Tt]halamus$, then this says “match the word thalamus with a captial or lowercase T and with the word appearing at the end of the string.” This query narrows it down to 36 matches, which is slightly better, but there is one more piece we need. Since we know thalamus is the only word in the region, it must come after its acronym. While we don’t know what the acronym is, we know the “:” character follows the acronym and there is a space between “:” and the first word of the region name. So if we change our regex to: /: [Tt]halamus$, then we get a single match, and it is the one we want: “TH: Thalamus”.
One final thing to note is that if you are fond of using the Python API for scripting your Neuroglancer sessions the segment query can be applied programmatically. This jupyter notebook example demonstrates how to do this: https://github.com/PrincetonUniversity/lightsheet_helper_scripts/blob/master/neuroglancer/segment_query_tutorial.ipynb
Hopefully this gets you started with using the search tool. Let us know if you find novel ways to use the search regex or have any questions!
* The search feature is available in the Google Neuroglancer client (https://neuroglancer-demo.appspot.com) and BRAIN CoGS Neuroglancer client (https://nglancer.pni.princeton.edu), but may be absent or function differently in other clients.